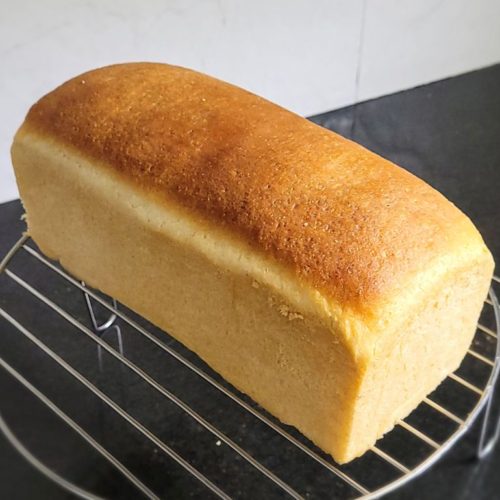
100% Semolina Bread (eggless)


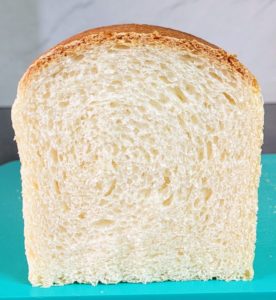
As you would have read in my earlier posts, semolina (rava) bread is my favorite. It produces such lovely flavorful loaf and a crunchy toast. If I get lazy and don’t make bread for a few days, my family starts demanding a semolina loaf. They prefer this one over a wheat or all purpose flour loaf.

Semolina
To make this bread you need to buy Baarik Rava/ Chiroti Rava/ Fine Semolina. If you have the normal semolina, just grind it a little. I also use milk and milk powder to get soft bread.

Kneading the dough
Proper kneading is key to getting a good loaf. When I started baking, I used to knead dough by hand. But it was a little tiring as it takes around 10-15 minutes of kneading – sometimes more. So I invested in a stand mixer. For over a year now I am using the Bosch stand mixer. And it has made baking bread much easier. I can knead up to 500 grams of flour at a time and the resulting loaf is sufficient for breakfast for a family of 5.

Yeast
I have always used Instant Dry Yeast in my baking. The two brands which I have tried out and which have yielded good results are Healthyhive and Gloripan.
My posts may contain affiliate links. If you buy something through one of those links, you won’t pay a penny more, but I may earn a small commission. Thanks!
Let’s get to baking this beautiful loaf!
100% Semolina Bread Loaf
Equipment
- OTG
- Stand Mixer
Ingredients
- 475 grams Fine Semolina (Baarik Rava)
- 1¼ tsp Salt
- 1 tsp Instant Yeast
- 1 tbsp Sugar
- 2 tbsp Olive Oil extra virgin
- 150 ml Milk
- 20 grams Milk Powder
- 50-100 ml Lukewarm Water
Instructions
- To get lukewarm water/milk microwave a cup of the liquid at medium temperature for 8-10 seconds. Please check that the liquid is not boiling hot or else it will kill the yeast. It should just be warm to touch.
- Put all the ingredients including milk but excluding water and olive oil in a big mixing bowl and stir well.
- Add lukewarm water little by little and mix till you get a shaggy dough. Be careful while adding water. Don't add the entire quantity at one go. It needs to be a slightly sticky dough (not of pourable consistency like cake batter).
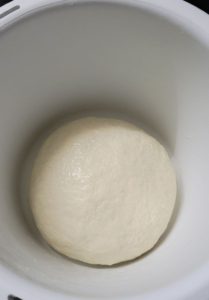
- I use a stand mixer to knead the dough (on speed 2). If you don't have one, transfer this dough to a kneading surface and knead for 10 – 15 minutes using the stretch and pull method. You can add the oil little by little and just knead it in. The dough will be sticky. Don't be tempted to add too much flour. If it's really unmanageable, then you can sprinkle some flour on the surface. Keep kneading till the dough turns into a smooth, soft dough.
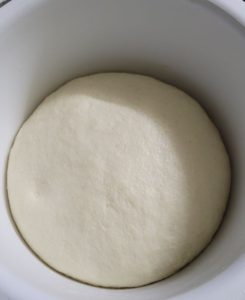
- Form this dough in the shape of a ball, tucking the ends beneath. Place it in a lightly oiled bowl and move the dough around a bit so that it gets oiled as well. Cover the bowl with a damp cloth or with a cling wrap and keep it in a warm place. Allow it to double in size (usually takes an hour).
- Once the dough has doubled, gently punch it to release all the gases and knead it for a minute or two.
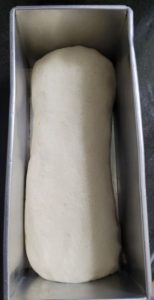
- Roll out the dough in the shape of a rectangle and then fold it tightly like a log.

- Seal the ends well.
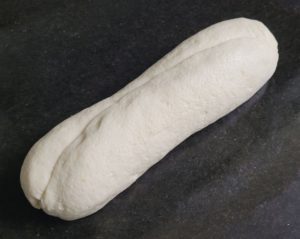
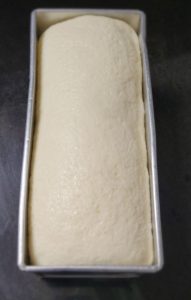
- Place the log in greased loaf pan. Apply a little milk or oil on top so that it doesn't dry out. I have used an 9*3.5 inch tin here. Let the dough rise till it has reached almost an inch below the brim of the tin.
- At this stage, begin preheating your oven to 180 degrees Celsius for 15 minutes. During this time, the loaf will rise further, say 1/2 inch above the rim. Bake the bread now for 40- 45 minutes . If the top of the loaf starts to brown too much, just cover it with an aluminum foil. (Don't open the door of the oven in the initial 20 minutes).
- Remove the bread from the oven and apply butter on top. After 4-5 minutes take it out of the tin and allow to cool on a wire rack for 2-3 hours before slicing it. You can cover the loaf with a soft damp cloth.
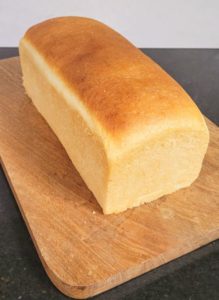
- Enjoy with a dollop of butter!!
Notes
- Use the fine variety of unroasted semolina. If you don’t have it, just grind regular semolina in a mixer to obtain a finer version.
- You can use butter in place of olive oil.
- Bread can be stored at room temperature in an airtight container for a couple of days (depending on the climate in your region). It would be better to cover leftover slices in a cling wrap/ freezer safe bag and freeze. Thaw in refrigerator/ microwave for few seconds before eating.
If you try out this recipe do post your comments on my blog. You can also post on Instagram and tag me @my.loaf.story